Extensions in Google Chrome
An extension in Google Chrome is a software module that enhances or modifies its functionality. It’s particularly pleasing that the majority of these additions are developed by ordinary community members, leading to a constant increase in their number independently of the browser creators.

This means that absolutely anyone, possessing a certain set of skills, can modify something in the application according to their own understanding, and the fruits of their labor can be used by anyone interested. It’s only regrettable that support for installing extensions in the Android version has not yet been implemented, unlike most competitors.
Viewing all extensions
You can see the full list of installed extensions, including inactive ones, in several ways:
- Open the internal address chrome://extensions/
- Using the menu → “Extensions” → “Manage Extensions”
- Through the quick access button on the toolbar (if at least 1 extension is installed)
Launching extensions
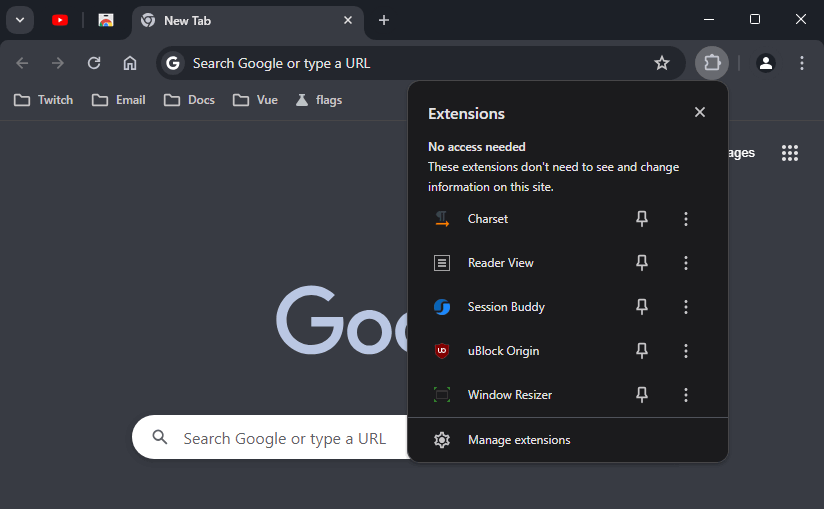
After installing the first extension in Chrome, a unified launch button for extensions appears to the right of the address bar. It was implemented to save toolbar space. Because if you added, for example, 10 extensions to Chrome, their buttons would occupy all the useful space at the top right of the browser window. The algorithm for launching the desired extension is as follows:
- Click on the “Extensions” button on the toolbar to display the list of all active extensions
- Click on the desired one to launch it
How to pin an extension
Using the previously mentioned unified button for accessing extensions, you can pin any of them to the toolbar. To do this:
- Click on the “Extensions” button
- Select the desired extension and use the “Pin” button with a pushpin icon
- As a result, a separate launch button for the corresponding extension will appear to the right of the address bar
How to disable
It’s not necessary to remove an extension if you don’t currently need it. You can temporarily deactivate it until you need it again. The procedure for disabling an extension in Chrome is as follows:
- Open the list of all extensions
- Find the extension you want to deactivate and toggle it to the inactive state
How to remove
- Open the list of all installed extensions
- Find the one you want to remove and click “Remove”
- Confirm the operation by clicking “Remove” again
Using in incognito
Initially, any extension is blocked from working in incognito mode due to privacy and security considerations imposed by this mode in Chrome. If you are completely confident in the publisher and want to activate any of them, you need to:
- Open the list of all extensions
- Select the desired one and click the “Details” button
- Find and activate the “Allow in incognito” option
Installing an extension
The process of installing extensions in Chrome is very simple, even a child can handle it. They are all collected in a single catalog called the “Chrome Web Store.” When adding a new extension here, it is checked for compliance with basic security conditions. Starting from version 71, it is no longer possible to install extensions from third-party sources. Let’s consider the installation process step by step:
- Open the Chrome Web Store
- use the search form at the top right to find a desired extension
- enter your search query, press Enter
- In the search results, select the appropriate extension, click on its name to go to the detailed description page
- Here, we are interested in the “Add to Chrome” button at the top right
- click on it to start the installation of the extension
- then Chrome will warn you about the actions the installed extension may perform
- if everything is acceptable, click “Add Extension”
- If done correctly, the new extension will appear in the general list